

To make canned cabbage soup, start by sautéing onions, garlic, and your choice of vegetables in a large pot until tender. Add chopped cabbage, broth, seasonings, and any desired proteins, then simmer the mixture until everything is fully cooked. Carefully ladle the hot soup into sterilized jars, leave the recommended headspace, seal them, and process in a pressure canner to ensure safe, long-lasting preservation.
Table of Contents
canning cabbage soup recipe
INTRODUCTION : canning cabbage soup recipe

Welcome, soup enthusiasts and canning crusaders! Have you ever wondered how to transform humble cabbage into a hearty, shelf-stable masterpiece that’s ready to warm your soul any time of year? Well, grab your aprons and get ready to dive into the delightful world of canning cabbage soup! Whether you’re a seasoned canner or just dipping your toes into the jar-filled adventure, we’ve got all the savory secrets, nifty tips, and step-by-step guidance you need to create the perfect batch. From selecting the freshest veggies to mastering the art of pressure canning, our playful guide will have you preserving deliciousness with a smile. So, stir up some excitement and keep reading—your ultimate cabbage soup canning journey starts right here!
Benefits of Canning Cabbage Soup at Home
Canning cabbage soup at home isn’t just a way to preserve your favorite hearty meal—it’s an adventure filled with tasty rewards! Let’s explore why jumping into the canning craze is a fantastic idea:
Preserving Freshness and Flavor
Who doesn’t love that just-picked veggie zing all year round? Canning locks in the vibrant flavors and crisp textures of fresh cabbage and other veggies, ensuring every spoonful bursts with garden-fresh goodness.
- Flavor Explosion: Capture the rich, savory notes of your homemade soup exactly as you intended.
- Nutrient Lock-In: Keep those essential vitamins and minerals intact for a healthy, delicious meal anytime.
- Year-Round Delight: Enjoy the taste of summer veggies even in the depths of winter!
Cost-Effective Meal Preparation
Why break the bank on store-bought soups when you can create your own delicious batches at a fraction of the cost? Canning cabbage soup is a budget-friendly way to savor gourmet meals without the gourmet price tag.
- Save Money: Bulk buying vegetables and ingredients reduces overall meal costs.
- Smart Spending: Utilize seasonal produce when it’s cheapest and most abundant.
- Value Packs: Make large quantities at once to get more bang for your buck!
Reducing Food Waste
Turn those extra veggies into a culinary masterpiece instead of letting them wilt away. Canning cabbage soup helps you make the most of your harvest and minimize kitchen waste.
- Zero Waste: Preserve surplus vegetables before they go bad.
- Eco-Friendly: Less food waste means a smaller environmental footprint.
- Creative Uses: Transform leftover ingredients into a delicious, nutritious soup.
Convenience for Busy Lifestyles
Life can get hectic, but having homemade canned cabbage soup on hand makes meal prep a breeze. Whether you’re juggling work, family, or hobbies, a ready-to-eat soup can save the day!
- Quick Meals: Heat and serve whenever hunger strikes—no cooking required!
- Stress-Free Planning: Always have a nutritious option available for unexpected guests.
- Time Saver: Batch cooking frees up your schedule for other important things.
Canning cabbage soup at home is a delightful blend of fun, flavor, and practicality. Dive into the process and reap these fantastic benefits while enjoying every savory bite!
Ingredients Needed for Canning Cabbage Soup
Ready to whip up some magical, mouthwatering cabbage soup? Great! Let’s gather all the scrumptious ingredients that will make your canned creation absolutely irresistible. From crisp veggies to tantalizing spices, here’s what you’ll need to get started:
Fresh Vegetables and Their Selection
Nothing beats the crunch and vibrancy of fresh veggies in your soup! Choosing the right vegetables ensures your cabbage soup is packed with flavor and nutrients.
- Cabbage: Opt for firm, bright green or purple cabbage heads for the best texture and taste.
- Onions: Sweet or yellow onions add a robust foundation to your soup.
- Carrots: Bring a hint of sweetness and a pop of color.
- Celery: Provides a delightful crunch and enhances the depth of flavor.
- Bell Peppers: For an extra burst of color and a touch of sweetness.
- Garlic: A few cloves to infuse your soup with aromatic goodness.
Choosing the Right Meat or Protein
Whether you’re a meat lover or prefer a plant-based punch, the right protein can elevate your cabbage soup to new heights.
- Beef: Chunks of tender stew beef or ground beef for a hearty, satisfying bite.
- Chicken: Boneless, skinless chicken thighs or breasts for a leaner option.
- Pork: Smoked sausage or bacon for a smoky, savory twist.
- Vegetarian Options: Lentils, beans, or tofu for a protein-packed, meat-free delight.
Herbs, Spices, and Seasonings
These little flavor powerhouses are what turn a good soup into an unforgettable one. Don’t be shy—let’s get creative!
- Bay Leaves: For that classic, comforting aroma.
- Thyme: Adds a subtle earthiness.
- Paprika: A dash of smoky or sweet paprika for depth.
- Black Pepper: Freshly ground for that perfect kick.
- Salt: To enhance all those wonderful flavors.
- Optional Extras: A sprinkle of crushed red pepper for some heat or a dash of Worcestershire sauce for extra umami.
Broths and Liquid Bases
The liquid is the soul of your soup, tying all those delicious ingredients together.
- Beef Broth: Rich and hearty, perfect for a robust soup.
- Chicken Broth: Light and versatile, great for a balanced flavor.
- Vegetable Broth: Ideal for a vegetarian or lighter option.
- Tomato Juice or Puree: For a tangy twist and vibrant color.
- Water: In a pinch, but broth is highly recommended for maximum flavor.
Optional Add-ins for Enhanced Flavor
Want to take your cabbage soup to the next level? These optional add-ins can add unique twists and extra layers of taste.
- Potatoes: Diced potatoes for extra heartiness.
- Corn: Adds a sweet crunch.
- Beans: Cannellini or kidney beans for more protein and texture.
- Tomatoes: Fresh or canned diced tomatoes for added acidity and depth.
- Herbal Infusions: A splash of apple cider vinegar or a squeeze of lemon juice to brighten up the flavors.
Gathering these fabulous ingredients is your first step toward canning a delicious batch of cabbage soup that’s ready to enjoy all year long. So, roll up your sleeves, get chopping, and let’s make some soup magic happen!
Essential Equipment for Canning Cabbage Soup
Ready to embark on your canning adventure? Fantastic! Having the right gear on hand makes the whole process smoother and more enjoyable. Let’s dive into the must-have equipment that will help you can your delicious cabbage soup like a pro:
Canning Jars and Lids
Think of canning jars as the cozy little homes for your soup—sturdy, reliable, and ready to keep your culinary creations safe and sound.
- Mason Jars: Classic and dependable, mason jars come in various sizes (quart and pint) to suit your soup-packing needs.
- Lids and Bands: Ensure you have new, high-quality lids and reusable metal bands. Remember, proper sealing is key to long-lasting preservation!
- Jar Lifter: This handy tool helps you safely handle hot jars without burning your hands. Safety first!
Pressure Canner vs. Water Bath Canner
Choosing the right canner is like picking the perfect pot for your soup—it makes all the difference in the final outcome.
- Pressure Canner:
- Best For: Low-acid foods like cabbage soup that require higher temperatures to eliminate harmful bacteria.
- Pros: Faster processing times and more versatile for a variety of recipes.
- Cons: Slightly more complex to use, but totally worth it for safe, delicious results!
- Water Bath Canner:
- Best For: High-acid foods like jams and pickles. Not ideal for cabbage soup.
- Pros: Simpler to operate and great for beginner canners handling high-acid recipes.
- Cons: Doesn’t reach the necessary temperatures for low-acid foods, so stick with a pressure canner for your soup needs!
Kitchen Tools: Measuring Cups, Ladles, and Funnels
These trusty sidekicks ensure your canning process is precise and mess-free, making you feel like a kitchen wizard.
- Measuring Cups and Spoons: Accurate measurements are essential for perfect flavor balance and safe preservation.
- Ladles: A sturdy, heat-resistant ladle helps you scoop your delicious soup into jars with ease.
- Funnels: Wide-mouth funnels prevent spills and make filling jars a breeze. Bonus points for those with a built-in strainer!
- Bubble Remover/Headspace Tool: Say goodbye to pesky air bubbles and ensure your jars are properly sealed with the right headspace.
Sanitizing Supplies
Cleanliness is next to canning-ness! Properly sanitized equipment keeps your soup safe and tasty for the long haul.
- Dish Soap and Hot Water: The dynamic duo for washing all your canning gear thoroughly.
- Sterilizing Solution or Boiling Water: Ensure your jars and lids are squeaky clean before filling them with soup.
- Clean Towels: Have plenty of lint-free towels on hand to dry and handle your sanitized jars without contamination.
Preparing Your Kitchen for Canning
Before you dive into the delightful world of canning cabbage soup, it’s time to set the stage for a smooth and successful adventure. Think of your kitchen as the playground where all the magic happens! Let’s get everything spick and span, organized, and safe so you can can like a champ:
Cleaning and Sanitizing Equipment
A clean kitchen is the foundation of any great canning project. Let’s make sure your tools are spotless and ready to keep your soup safe and delicious.
- Wash Everything Twice: Give your canning jars, lids, and all equipment a thorough wash with hot, soapy water. Rinse them well to remove any lingering suds.
- Sterilize Your Jars: Boil your jars in a large pot of water for 10 minutes to kill any sneaky bacteria. Keep them hot until you’re ready to fill them.
- Sanitize Lids and Bands: Follow the manufacturer’s instructions to ensure your lids are properly sanitized. Remember, a good seal starts with clean lids!
- Clean Your Canner: Whether you’re using a pressure canner or a water bath canner, make sure it’s free from any old food residues. A clean canner is a happy canner!
Organizing Ingredients and Tools
A well-organized kitchen makes canning a breeze. Let’s gather and arrange everything you need so you can focus on creating your tasty masterpiece.
- Mise en Place: French for “everything in its place,” this handy technique ensures all your ingredients are prepped and ready before you start cooking.
- Chop and Measure: Dice your vegetables, measure out your spices, and have your broths and proteins ready to go.
- Label Your Ingredients: Keep track of what you’re using with labels—no more guessing games!
- Set Up Your Workspace: Arrange your tools and ingredients in a logical order to streamline the canning process.
- Cooking Station: Have your pots, spoons, and burners easily accessible.
- Filling Station: Set up your jars, ladles, funnels, and bubble removers nearby for easy filling.
- Processing Area: Ensure your canner is ready with all necessary parts and nearby access to a heat source.
- Gather All Tools: Make sure you have everything on hand before you start to avoid any mid-process scavenger hunts.
- Measuring Cups and Spoons
- Ladles and Funnels
- Jar Lifter and Tongs
- Clean Towels and Cloths
Safety Precautions to Follow
Safety first, soup makers! Let’s cover the essential precautions to keep you and your kitchen safe while you can your delicious cabbage soup.
- Read the Recipe Thoroughly: Familiarize yourself with the steps and timing before you begin. Knowledge is power!
- Use Proper Canning Techniques: Follow recommended processing times and pressures to prevent any food safety issues.
- Handle Hot Jars with Care: Always use jar lifters and wear oven mitts to protect your hands from burns.
- Check for Broken Jars: Inspect each jar for cracks or chips before filling. A broken jar is a no-go!
- Maintain a Clean Environment: Keep your workspace free from distractions and ensure everyone around knows to stay clear while you’re canning.
- Monitor Your Canner: Never leave your canner unattended while it’s processing. Stay alert to ensure everything is running smoothly.
- Cool Down Safely: Allow your jars to cool undisturbed on a flat surface. Avoid moving them around until they’re completely cooled to prevent breakage or sealing issues.
Step-by-Step Instructions to Can Cabbage Soup
Now that you’re all set with your ingredients and equipment, it’s time to roll up your sleeves and dive into the delightful process of canning your very own cabbage soup! Follow these playful yet precise steps to ensure your soup is preserved to perfection:
Preparing the Cabbage and Other Vegetables
Let’s get chopping! Preparing your veggies correctly is the first tasty step toward a successful canned soup.
- Wash and Clean: Give all your vegetables a thorough wash under cold running water to remove any dirt or impurities.
- Chop with Care: Dice your cabbage, onions, carrots, celery, and any other veggies into uniform pieces for even cooking and packing.
- Sauté for Flavor: In a large pot, sauté onions and garlic in a bit of oil until they’re soft and fragrant. This creates a rich and flavorful base for your soup.
- Blanch Cabbage (Optional): For extra tenderness, you can blanch the cabbage by boiling it for 2-3 minutes and then plunging it into ice water. This step is optional but can enhance texture.
Cooking the Soup Base
Time to simmer up some magic! Cooking the soup base properly ensures all the flavors meld beautifully.
- Combine Ingredients: Add the sautéed onions and garlic to a large soup pot. Stir in the chopped cabbage, carrots, celery, and your chosen protein.
- Pour in the Broth: Whether you’re using beef, chicken, or vegetable broth, pour it in to cover the vegetables. Don’t forget to add your herbs, spices, and seasonings.
- Simmer to Perfection: Bring the mixture to a boil, then reduce the heat and let it simmer gently for about 30-45 minutes, or until all the vegetables are tender and the flavors are well combined.
- Taste and Adjust: Give your soup a taste and adjust the seasoning as needed. Remember, a well-seasoned soup is a happy soup!
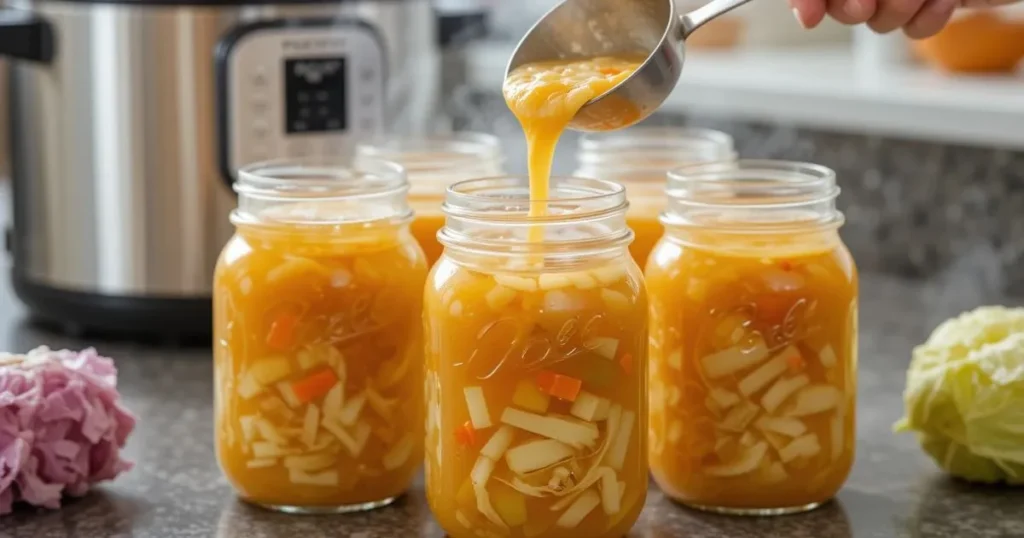
Filling the Canning Jars Properly
Now comes the fun part—filling those jars with your delicious, hearty soup!
- Prepare Your Jars: Ensure your canning jars are hot and sterilized. Keep them warm until you’re ready to fill to prevent cracking.
- Ladle with Love: Using a ladle, carefully scoop the hot soup into each jar, leaving about 1-inch of headspace at the top. This gap is essential for achieving a proper seal.
- Use a Funnel: To avoid spills and ensure neat jars, use a wide-mouth funnel. It makes filling much easier and mess-free!
- Wipe the Rims: Clean the rims of the jars with a damp cloth to ensure a good seal. Any leftover soup can prevent the lids from sealing properly.
Removing Air Bubbles and Sealing Jars
Say goodbye to pesky air bubbles and hello to perfectly sealed jars!
- Release the Air Bubbles: Use a non-metallic spatula or bubble remover to gently stir the soup in each jar, pushing out any trapped air bubbles.
- Adjust Headspace: After removing the bubbles, make sure the headspace is still at 1 inch. Add more soup or broth if needed.
- Seal It Up: Place the sanitized lid on each jar and screw on the band until it’s fingertip-tight. Don’t overdo it—just snug enough to keep the lid in place during processing.
Processing the Jars Using a Pressure Canner
Safety first! Proper processing ensures your soup is preserved safely for long-term storage.
- Load the Canner: Place the filled jars into the pressure canner, ensuring they aren’t touching each other. Follow your canner’s instructions for proper placement.
- Add Water: Pour the recommended amount of water into the canner, typically about 2-3 inches, depending on your canner’s guidelines.
- Seal and Vent: Secure the lid on the canner and vent steam for 10 minutes to remove any air. This step is crucial for maintaining the right pressure.
- Set the Pressure: Bring the canner to the recommended pressure (usually 10-15 PSI for soups) and maintain it for the specified processing time, typically around 75 minutes for quart jars.
- Monitor the Process: Keep an eye on the pressure gauge and ensure it stays steady throughout the processing time.
Cooling and Storing the Canned Soup
Almost there! Let’s finish up by cooling and storing your delicious canned cabbage soup.
- Release the Pressure: Once the processing time is up, turn off the heat and allow the pressure to drop naturally before opening the canner. This can take about 10-15 minutes.
- Remove the Jars: Using a jar lifter, carefully take the hot jars out of the canner and place them on a clean, dry towel. Avoid touching the jars directly to prevent burns.
- Check the Seals: Once the jars have cooled for 12–24 hours, test the seals by pressing the center of each lid. If it doesn’t pop back, it’s sealed tight! If it does, refrigerate and use the soup within a few days.
- Label and Store: Label your jars with the date and contents, then store them in a cool, dark place. Properly canned cabbage soup can last up to a year, ready to warm your heart and tummy whenever you need it!
Tips for Successful Pressure Canning

Pressure canning is the superhero of the canning world, especially when it comes to preserving low-acid goodies like your delicious cabbage soup. To ensure your canning adventures are smooth and your soup stays safe and tasty, here are some top-notch tips to guide you along the way:
Selecting the Right Canning Method
Choosing the perfect canning method is like picking the right tool for a fun DIY project—it makes all the difference!
- Pressure Canning:
- When to Use: Ideal for low-acid foods such as meats, vegetables, and, of course, your hearty cabbage soup.
- Why It’s Awesome: Reaches higher temperatures (240°F or higher) necessary to kill harmful bacteria like botulism.
- Best For: Ensuring your soup is safely preserved for long-term storage.
- Water Bath Canning:
- When to Use: Perfect for high-acid foods like jams, jellies, and pickles.
- Why It’s Not Ideal for Soup: Doesn’t reach the high temperatures needed for low-acid foods, making it unsuitable for safely canning cabbage soup.
Pro Tip: Stick with pressure canning for your cabbage soup to guarantee safety and flavor!
Adjusting for Altitude
Living high up in the mountains? No worries! Just a few tweaks can make your pressure canning process flawless.
- Why It Matters: Higher altitudes have lower atmospheric pressure, which affects boiling points and canning pressure.
- How to Adjust:
- Increase Pressure: Follow your pressure canner’s manual for altitude adjustments. Typically, you need to add 5 pounds per square inch (psi) for every 1,000 feet above sea level.
- Extend Processing Time: Some recipes may require a few extra minutes to ensure thorough processing.
- Check Guidelines: Always refer to trusted canning resources or your canner’s instructions for precise adjustments based on your specific altitude.
Mountain Canning Tip: Double-check your altitude settings before starting to keep your soup perfectly preserved!
Timing and Temperature Control
Mastering the timing and temperature is like conducting a delicious orchestra—every element needs to be just right.
- Preheat Your Canner: Just like preheating an oven, getting your pressure canner up to temperature before adding jars ensures even processing.
- Maintain Steady Pressure:
- Start at High Heat: Bring the canner up to the required pressure quickly.
- Stabilize the Heat: Once at pressure, reduce the heat to maintain a steady, consistent pressure without fluctuations.
- Follow Processing Times:
- Quarts vs. Pints: Make sure you’re following the correct processing time for the size of your jars. Typically, quarts take a bit longer than pints.
- Don’t Rush: Allow the full processing time to eliminate all potential bacteria and ensure a safe seal.
- Use a Timer: Keep track of your processing time with a reliable timer to avoid under or over-processing.
Cooking Clock Tip: Set reminders to keep your canning process on track and your soup safely sealed!
Troubleshooting Common Pressure Canning Issues
Even the best canners run into hiccups now and then. Here’s how to tackle some common pressure canning challenges with ease and a smile:
- Pressure Fluctuations:
- Solution: If your canner loses pressure, check the gasket and ensure the vent is clear. Regulate the heat to keep the pressure consistent.
- Jars Not Sealing Properly:
- Solution: Make sure you’ve wiped the rims clean and used new lids. If a jar doesn’t seal after cooling, refrigerate and use the soup within a few days or reprocess with a new lid.
- Overfilled or Underfilled Jars:
- Solution: Measure your headspace carefully. Use a funnel and ladle to ensure you’re filling each jar correctly, leaving the recommended space for expansion.
- Canner Not Building Pressure:
- Solution: Ensure the canner lid is properly locked and the vent is clear. Double-check the pressure settings and make sure you’re using the right type of canner for your recipe.
- Boil-Over or Spills:
- Solution: Avoid overfilling your canner with water. Follow the manufacturer’s guidelines for the correct water level to prevent spills during processing.
Problem-Solving Tip: Keep a troubleshooting checklist handy to quickly address any canning quirks and keep your soup canning journey smooth!
FAQ
How Long Does Canned Cabbage Soup Last?
Properly canned cabbage soup can last up to one year when stored in a cool, dark place. Always check the seals and inspect the jars for any signs of spoilage before consumption. For the best flavor and quality, use the soup within the recommended timeframe.
Can I Freeze Canned Cabbage Soup?
Yes, you can freeze canned cabbage soup for extended storage beyond the canning period. Transfer the soup to airtight freezer-safe containers, leaving some headspace for expansion. Label the containers with the date and use within 3 to 6 months for optimal taste and texture.
What to Do If a Jar Doesn’t Seal Properly?
If a jar doesn’t seal properly, refrigerate it immediately and consume the soup within a few days. Do not attempt to reprocess the jar, as it may not be safe for long-term storage. Alternatively, you can reprocess the contents using a new lid following proper canning procedures.
Conclusion: Your Canning Adventure Awaits!
You’ve now got all the secrets to canning delicious cabbage soup right at your fingertips. Enjoy the satisfaction of homemade goodness preserved just for you and your loved ones. Happy canning, and may your jars always be filled with warmth and flavor!
Key Takeaways
- Enjoy Freshness Year-Round: Canning preserves the vibrant flavors and nutrients of fresh cabbage and vegetables, allowing you to enjoy homemade soup any time.
- Cost-Effective and Sustainable: By canning your own soup, you save money, reduce food waste, and make the most of seasonal produce.
- Essential Equipment Matters: Having the right jars, pressure canner, and kitchen tools ensures a smooth and successful canning process.
- Follow Safety Guidelines: Understanding the difference between low-acid and high-acid foods, preventing contamination, and ensuring proper seals are crucial for safe preservation.
- Master the Canning Process: From preparing ingredients to processing jars in a pressure canner, each step is vital for delicious and long-lasting canned soup.
- Adapt to Your Needs: Easily adjust recipes to fit dietary preferences and troubleshoot common canning issues with confidence.
- Celebrate Your Success: Canning cabbage soup not only provides convenient meals but also offers a rewarding and enjoyable culinary experience.
Embrace these key points to make your canning journey delightful and your pantry stocked with tasty, homemade cabbage soup!