

The Best Gipfeli Recipe (Swiss Butter Croissants)
Table of Contents
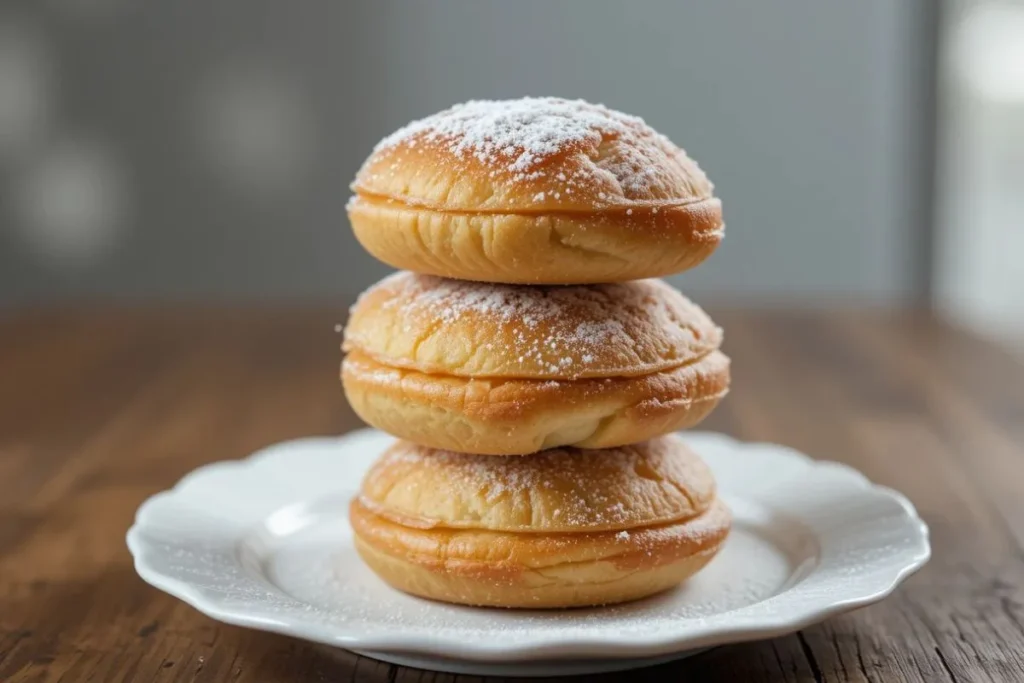
Introduction: Making Gipfeli Recipe at Home

Gipfeli, Switzerland’s answer to the classic croissant, is a deliciously light, flaky, and buttery pastry that’s perfect for breakfast or an afternoon treat. While similar to French croissants, Gipfeli has a slightly different texture—less buttery but just as crisp and airy.
Making Gipfeli from scratch may seem intimidating, but with the right technique, it’s simpler than you might think. This guide will walk you through each step, from preparing the dough to shaping and baking your pastries to perfection. Along the way, you’ll find helpful tips to ensure your Gipfeli turn out just right, whether you prefer them plain or filled with something sweet or savory.
By the end of this recipe, you’ll have a batch of fresh, homemade Gipfeli that rival those found in Swiss bakeries. So, let’s get started and bring a little taste of Switzerland to your kitchen!
What is Gipfeli?
If you’ve ever strolled through a Swiss bakery in the early morning, chances are you’ve caught a whiff of something buttery, warm, and absolutely irresistible. That, my friend, is Gipfeli—Switzerland’s take on the classic crescent-shaped pastry.
So, what exactly makes Gipfeli special? Let’s break it down!
A Swiss Breakfast Staple
Gipfeli is a beloved morning treat in Switzerland, often enjoyed with a cup of coffee or hot chocolate. Whether you grab one fresh from a bakery or make your own at home, it’s the kind of pastry that turns an ordinary breakfast into something special.
- Light and flaky, but with a slightly firmer bite than a French croissant
- Perfectly golden on the outside, soft and airy on the inside
- Often enjoyed plain, but can also be filled with chocolate, jam, or even ham and cheese
How is Gipfeli Different from a Croissant?
At first glance, you might mistake Gipfeli for a croissant, but there are some key differences:
Less buttery: While croissants are rich with layers of butter, Gipfeli are a bit lighter and not quite as greasy.
Slightly denser texture: They still have layers, but they’re a little firmer and less airy than their French cousin.
More straightforward to make: Since they don’t require the same intensive laminating process, Gipfeli is beginner-friendly!
Regional Variations of Gipfeli in Switzerland
Like any great traditional food, Gipfeli comes in a few delicious variations depending on where you are in Switzerland:
Classic Butter Gipfeli – The most common type, made with a simple dough and a golden, crispy exterior.
Schoggi-Gipfeli – A chocolate-filled version that’s a favorite among kids (and let’s be honest, adults too!).
Käse-Gipfeli – A savory version stuffed with Swiss cheese—because, of course, Switzerland loves its cheese!
Honey or Nut-Filled Gipfeli – Some regions add a touch of sweet filling, like honey, nuts, or almond paste, for a richer flavor.
No matter how you enjoy it, one thing is certain—a fresh, homemade Gipfeli is always worth the effort. Ready to make your own? Let’s get started!
Ingredients You’ll Need
Before we start making Gipfeli , let’s go over the ingredients. You don’t need anything fancy—just a few simple ingredients to create these delicious pastries.
For the Dough:
- Flour – All-purpose flour works best, but bread flour can add more texture.
- Butter– Opt for premium unsalted butter to maximize flavor.
- Milk – Adds richness and helps create a soft dough.
- Yeast – Instant or active dry yeast makes the dough rise.
- Sugar – A little sweetness to balance the flavors.
- Salt – Brings out the taste and helps with the dough’s texture.
For the Assembly:
- Egg Wash – A mix of egg yolk and milk gives Gipfeli a shiny, golden crust.
- Optional Fillings:
- Chocolate – A sweet treat inside.
- Ham & Cheese – A savory option.
- Jam or Honey – Adds a fruity or sweet touch.
Alternative Ingredient Options:
- Vegan Version: Use dairy-free butter and almond or oat milk.
- Gluten-Free Option: Swap flour for a gluten-free blend (texture may be slightly different).
- Dairy-Free Version: Use plant-based milk instead of regular milk.
Step-by-Step Guide to Making Gipfeli

Making homemade Gipfeli may seem like a challenge, but don’t worry! With this step-by-step guide, you’ll be able to create flaky, golden, and delicious Swiss butter croissants right in your own kitchen. Just take your time, follow the steps carefully, and soon you’ll be enjoying warm, fresh pastries with a cup of coffee. Let’s get started!
Step 1: Preparing the Dough
The dough is the foundation of great Gipfeli, so getting it right is essential. This step ensures the perfect texture—soft on the inside, crispy on the outside.
Activate the Yeast
To start, warm the milk slightly—it should be warm to the touch but not hot (about 100–110°F or 37–43°C). Add sugar and yeast, stir gently, and let it sit for 5–10 minutes. When the mixture turns foamy, your yeast is activated and ready to use.
💡 Tip: If the yeast doesn’t foam up, it may be expired, or the milk might have been too hot or too cold. Try again with fresh yeast!
Mix the Dough
In a large mixing bowl, mix the flour and salt together . Add the yeast mixture and softened butter, then mix until a rough dough forms. The dough will look slightly shaggy at first, but don’t worry—it will come together as you knead.
Knead the Dough
Transfer the dough to a lightly floured surface and knead for 5–7 minutes until it’s smooth and elastic. You’ll know the dough is ready when it springs back slightly when poked and has a soft, smooth texture.
💡 Tip: If the dough is too sticky, add a little more flour, one tablespoon at a time. If it seems too dry, add just a splash of milk.
First Proofing (Let the Dough Rise)
Place the dough in a lightly greased bowl, cover it with a kitchen towel or plastic wrap, and let it rise in a warm place for 1–2 hours, or until it doubles in size.
💡 Pro Tip: If your kitchen is cold, place the dough in the oven with the light on—this creates a warm environment perfect for proofing!
Step 2: Rolling and Folding
This is where Gipfeli starts to develop those flaky, buttery layers that make them so irresistible.
Roll Out the Dough
After the dough has risen for the first time, gently punch it down to expel the excess air. Lightly flour your surface and roll the dough into a large rectangle, about ¼ inch (6 mm) thick.
Fold in Butter (Optional for Extra Flakiness!)
For an even flakier texture, spread a thin layer of softened butter over half of the dough, then fold it in half. Roll it out again into a rectangle and repeat this step once more. This creates extra layers for an airy, crisp pastry.
Keep the Dough Cool
If the butter starts to soften too much while rolling, chill the dough for 10–15 minutes before continuing. Keeping it cool helps maintain the flaky structure.
💡 Tip: Working with slightly chilled dough makes shaping easier and prevents butter from melting into the dough.
Step 3: Shaping the Gipfeli
Now for the fun part—turning the dough into beautiful crescent-shaped Gipfeli!
Cut the Dough into Triangles
Roll the dough out one last time into a large rectangle. Use a sharp knife or pizza cutter to cut it into long, narrow triangles (about 4 inches wide at the base and 8 inches long).
Roll Them Up
Starting from the wide end of each triangle, gently roll the dough toward the pointed tip. Place each rolled-up Gipfeli on a baking sheet, tip-side down, so they don’t unroll while baking.
💡 Tip: If you want a more curved shape, slightly bend the ends inward after rolling.
Step 4: Proofing and Baking
This is the final step before your kitchen fills with the delicious smell of freshly baked Gipfeli!
Second Proofing (Final Rise)
Cover the shaped Gipfeli with a towel and let them rise for another 30–45 minutes. This second rise ensures that the pastries bake up light, airy, and tender on the inside.
Brush with Egg Wash
For that perfect golden-brown shine, mix one egg yolk with a splash of milk and brush it over the surface of each Gipfeli.
💡 Tip: If you want an extra crispy crust, sprinkle a tiny bit of sugar on top before baking.
Bake Until Golden Brown
Preheat your oven to 375°F (190°C). Bake the Gipfeli for 15–18 minutes or until they turn a deep golden brown and are crisp on the outside.
💡 Tip: If baking multiple trays, rotate them halfway through for even browning.
Step 5: Serving and Enjoying
Congratulations! Your homemade Gipfeli are ready to be enjoyed. Here’s how to maximize their potential:
Let them cool slightly – They will be extremely hot right out of the oven!
Best served warm – This is when they are at their flakiest and most flavorful.
Pair with spreads – Serve with butter, jam, honey, or Nutella for extra deliciousness.
Enjoy with coffee, tea, or hot chocolate – The classic way to savor Gipfeli.
💡 Storage Tip: If you have leftovers (which is rare!), store them in an airtight container at room temperature for up to 2 days. To reheat, pop them in a warm oven for 5 minutes at 300°F (150°C) to restore crispiness.
Expert Tips for the Best Gipfeli

Want to take your Gipfeli from good to bakery-quality amazing? These expert tips will help you achieve flakier layers, better texture, and that perfect golden finish. Follow these secrets, and your homemade Gipfeli will be light, airy, and absolutely irresistible!
How to Make Gipfeli Extra Flaky
Flaky layers are what make Gipfeli so special, and getting them just right is all about handling the dough properly.
Use cold butter – Chilled butter melts more slowly in the oven, creating delicate, crisp layers. If your kitchen is warm, freeze the butter for 10 minutes before using.
Don’t overwork the dough – Too much kneading makes the dough tough, which reduces flakiness. Cease kneading once the dough reaches a smooth, elastic consistency.
Chill the dough before rolling – After kneading, let the dough rest in the fridge for at least 30 minutes before rolling. This prevents the butter from melting into the dough too soon.
Keep your workspace cool – If the butter starts melting while rolling, place the dough in the fridge for 10–15 minutes before continuing.
Roll the dough evenly – A consistent thickness (about ¼ inch) ensures that all Gipfeli bake at the same rate and develop beautiful layers.
Avoiding Common Mistakes
Even experienced bakers can make mistakes that affect the final result. Here are some pitfalls to avoid when making Gipfeli:
Over-kneading the dough – This makes Gipfeli too dense. Knead just until the dough is smooth and elastic—no need to go beyond that.
Underproofing the dough – If the dough doesn’t rise enough, the pastries will turn out flat and chewy instead of light and airy. Ensure that the dough doubles in size during its first rise.
Skipping the second proof – After shaping the Gipfeli, let them rise again for at least 30 minutes before baking. This helps them puff up properly.
Too much flour while rolling – Excess flour can dry out the dough, making the Gipfeli tough. Use just enough to prevent sticking—no more!
Not sealing the tip properly – If the tip of your rolled-up Gipfeli isn’t pressed down well, they may unroll while baking. Always press the tip gently onto the pastry before proofing.
Choosing the Best Butter for Maximum Flavor
Butter is one of the most important ingredients in Gipfeli, so using the right kind makes a huge difference in taste and texture.
Best Choice: European-style butter (82%+ fat content) – Higher butterfat content means richer flavor and flakier layers. Look for Swiss, French, or Irish butter for the best results.
Regular unsalted butter (80% fat) – This works well too, but Gipfeli made with higher-fat butter will be extra rich and tender.
Adjusting Hydration Levels Based on Flour Type
Flour absorbs liquid differently depending on brand, type, and humidity levels. If your dough feels too dry or too sticky, here’s how to fix it:
Using Bread Flour? – Bread flour absorbs more liquid, so you may need to add a tiny splash of extra milk to keep the dough soft and elastic.
Using All-Purpose Flour? – This is the most common choice and usually doesn’t need adjustments. But if the dough feels too sticky, add a tablespoon of flour at a time while kneading.
Baking in a Dry Climate? – The dough may dry out faster, so cover it with a damp towel while proofing and add a little extra milk if needed.
Baking in a Humid Climate? – Too much moisture in the air can make the dough sticky and hard to handle. Use a little extra flour to prevent sticking, and chill the dough if it gets too soft.
Final Takeaway: Mastering Gipfeli Like a Pro
By following these expert tips, your homemade Gipfeli will be just as flaky, buttery, and golden as the ones in Swiss bakeries. Here’s a quick recap:
Keep ingredients (especially butter) cold for flakier layers
Don’t over-knead or underproof to avoid dense pastries
Use high-quality butter for the richest taste
Adjust flour and hydration based on your baking environment
Let the dough rest and proof properly for the best texture
What to Serve with Gipfeli
Gipfeli are delicious on their own, but the right pairing can take them to the next level! Whether you prefer a sweet or savory touch, here are some of the best ways to enjoy these Swiss pastries.
Best Coffee & Tea Pairings
A warm, buttery Gipfeli is even better with the perfect drink to complement its light, flaky texture.
Coffee Pairings
If you love coffee, these options will enhance the richness of Gipfeli:
- Espresso – A bold contrast to the mild sweetness of Gipfeli.
- Cappuccino – The creamy foam pairs beautifully with the crisp, buttery layers.
- Latte – Smooth and mild, perfect for dipping your Gipfeli!
- Swiss Mocha – A mix of coffee and chocolate, ideal for a chocolate-filled Gipfeli.
Tea Pairings
If you prefer tea, here are some great options:
- Earl Grey – The citrusy bergamot flavor balances the buttery richness.
- Black Tea – A strong tea like Assam or English Breakfast pairs well with plain or sweet Gipfeli.
- Chai Latte – The warm spices complement the pastry’s light sweetness.
- Green Tea – A subtle, refreshing option for those who prefer less sweetness.
Swiss Jams & Spreads
Gipfeli taste amazing with a spread of sweet jam or honey. Here are some classic Swiss favorites:
- Apricot Jam (Aprikosenkonfitüre) – A sweet and slightly tart option that pairs beautifully with Gipfeli.
- Raspberry Jam (Himbeerkonfitüre) – A rich, fruity contrast to the buttery layers.
- Honey (Schweizer Honig) – Swiss honey adds a delicate floral sweetness.
- Nutella – A creamy chocolate-hazelnut spread for an indulgent treat.
- Almond Butter – A nutty, slightly savory option that pairs well with warm Gipfeli.
💡 Tip: Warm your Gipfeli slightly before spreading jam or honey—it melts into the flaky layers for an extra delicious bite!
Cheese & Ham for a Savory Touch
If you prefer savory over sweet, Gipfeli can be paired with classic Swiss cheese and meats for a delicious breakfast or brunch option.
Best Cheese Pairings:
- Gruyère – A slightly nutty Swiss cheese that melts beautifully inside a warm Gipfeli.
- Emmental – The classic “Swiss cheese” with a mild, slightly sweet taste.
- Appenzeller – A stronger, more aromatic cheese for those who love bold flavors.
Best Ham & Meat Pairings:
- Prosciutto – Thinly sliced and slightly salty, this pairs perfectly with buttery Gipfeli.
- Smoked Ham – A great choice for a heartier, more traditional breakfast.
- Salmon & Cream Cheese – A more refined option, perfect for a fancy brunch.
💡 Tip: Slice your Gipfeli in half and fill it with cheese and ham for an easy Swiss-style sandwich!
Enjoying Gipfeli at Home
There’s something special about freshly baked Gipfeli, warm from the oven, filling your kitchen with that irresistible buttery aroma. While they’re a staple in Swiss bakeries, making them at home turns them into a cozy, homemade treat that feels extra special.
Make It a Weekend Tradition
Gipfeli is the perfect weekend breakfast pastry—light, flaky, and just indulgent enough to start your day on a high note.
Bake a fresh batch on Saturday or Sunday morning for a cozy breakfast.
Involve family or friends—rolling and shaping the dough together is a fun activity!
Make extra and freeze—reheat them in the oven throughout the week for a quick treat.
💡 Tip: Serve them with coffee, jam, and cheese for a true Swiss-style breakfast experience!
Bringing a Taste of Switzerland to Your Table 🇨🇭
Even if you’re far from the Swiss Alps, you can bring a little Swiss charm into your home with homemade Gipfeli.
Recreate a Swiss-style breakfast with fresh fruit, butter, and Swiss honey.
Pair with other Swiss treats like Rösti (crispy Swiss potato pancakes) or Birchermüesli (Swiss muesli).
Host a Swiss brunch with friends—serve Gipfeli alongside Swiss coffee and cheese platters.
💡 Fun Idea: Put on some Swiss folk music or watch a video of the Alps while enjoying your Gipfeli for the full experience!
More Delicious Pastry Recipes to Try
If you love baking and enjoyed making Gipfeli, why stop here? Here are some other delicious European pastries that you’ll love!
Other Swiss Breakfast Favorites 🇨🇭
Zopf (Swiss Braided Bread) – A slightly sweet, soft, and buttery bread that’s perfect for breakfast.
Apfelstrudel – While originally Austrian, this flaky apple-filled pastry is also popular in Switzerland.
Birchermüesli – Not a pastry, but a classic Swiss breakfast made with oats, yogurt, and fruit.
Käsewähe (Swiss Cheese Tart) – A savory pastry that’s like a cross between a quiche and a tart.
Easy European Pastries You’ll Love 🇪🇺
French Croissants – If you loved Gipfeli, try making classic French croissants for an extra buttery treat!
Pain au Chocolat – A chocolate-filled cousin of the croissant, perfect for chocolate lovers.
Berliner (German Doughnuts) – Soft, pillowy doughnuts filled with jam or custard.
Danish Pastries – Flaky, buttery, and often topped with fruit, cream cheese, or nuts.
Italian Biscotti – Crunchy, nutty, and perfect for dipping in coffee.
Frequently Asked Questions (FAQs)
Got questions about making the perfect Gipfeli? Here are answers to some common baking concerns so you can make flaky, golden pastries with confidence!
Can I Freeze Gipfeli Dough? (Best Way to Store & Thaw)
Yes! Gipfeli dough freezes very well, making it easy to prepare in advance.
To freeze unbaked dough: After shaping the Gipfeli, place them on a tray and freeze until solid. Then, transfer them to an airtight container or freezer bag for up to 2 months.
To bake from frozen: Let them thaw overnight in the fridge, then proof at room temperature for 45–60 minutes before baking as usual.
To freeze baked Gipfeli: Let them cool completely, then store in an airtight bag or container. Reheat in the oven at 300°F (150°C) for 5–10 minutes to restore crispiness.
Can I Make Gipfeli Without Yeast? (Alternative Methods)
Yes, but the texture will be different. Yeast gives Gipfeli their light, airy texture, but if you don’t have yeast, you can try these alternatives:
Baking Powder Version: Replace yeast with 2 teaspoons of baking powder and skip the proofing time. The result will be more like a buttery, flaky biscuit rather than a traditional Gipfeli.
Sourdough Gipfeli: If you have a sourdough starter, you can use it in place of yeast, but the rise time will be longer (overnight fermentation is best).
💡 Note: Without yeast, Gipfeli won’t be as light and fluffy, but they’ll still be delicious!
How Do I Store Baked Gipfeli? (Keeping Them Fresh Longer)
Freshly baked Gipfeli are best enjoyed the same day, but you can store them for later.
At room temperature, store them in an airtight container for up to 2 days. When you’re ready to enjoy, refresh them by warming in a 300°F (150°C) oven for 5 minutes.
In the fridge: Not recommended, as refrigeration can dry them out.
In the freezer: Freeze for up to 2 months and reheat in the oven when needed.
💡 Tip: Avoid microwaving, as it makes them soggy. Always reheat in the oven for the best texture.
Do I Need an Egg Wash? (Egg Alternatives)
Egg wash helps Gipfeli achieve their golden, shiny crust, but if you can’t use eggs, try these alternatives:
Milk or Cream – Gives a subtle golden color and soft crust.
Butter – Melted butter brushed on top adds flavor and richness.
Maple Syrup + Water – A touch of sweetness and shine.
Aquafaba (Chickpea Water) – A great vegan alternative that mimics egg wash well.
💡 Tip: If you want extra crispiness, sprinkle a little sugar on top before baking!
Can I Add Extra Flavors to the Dough? (Sweet & Savory Variations)
Absolutely! Gipfeli can be customized with different flavors and fillings:
Sweet Variations:
Vanilla or Almond Extract – Adds a hint of extra flavor.
Cinnamon or Cardamom – Mix into the dough for a subtle spice.
Chocolate Chips or Dried Fruit – Fold into the dough before rolling.
Savory Variations:
Grated Cheese (Gruyère, Parmesan, or Cheddar) – For a cheesy twist.
Herbs (Rosemary, Thyme, or Oregano) – Mix into the dough for a savory aroma.
Garlic or Onion Powder – Adds a bit of depth to the flavor.
💡 Tip: If adding flavors, be careful not to overload the dough—too much moisture can affect how it bakes!
What If I Don’t Have a Rolling Pin? (Workarounds for Home Bakers
No rolling pin? No problem! Try these household alternatives:
Wine Bottle – A smooth, clean wine bottle works just like a rolling pin.
Water Bottle (Filled) – A sturdy, filled bottle can roll out the dough evenly.
Hands + Flat Surface – Press and stretch the dough gently with your hands.
💡 Tip: If using a bottle, lightly flour the surface to prevent sticking.
How Can I Make My Gipfeli Extra Crispy? (Oven Tricks for a Crisp Finish)
Want a shatteringly crisp crust? Try these simple baking tricks:
Use a Hot Oven – Bake at 375°F (190°C) for the best balance of crispiness and fluffiness.
Preheat Your Baking Tray – Placing Gipfeli on a hot tray helps the bottoms crisp up faster.
Brush with Butter After Baking – A light butter glaze adds richness and a bit of crunch.
Bake Until Deep Golden Brown – Don’t take them out too soon! A deep golden color means they’re perfectly crisp.
Conclusion: The Joy of Homemade Gipfeli
Congratulations! You’ve just unlocked the secrets to making authentic Swiss Gipfeli—golden, flaky, and absolutely delicious. Whether you followed this Gipfeli recipe step by step or simply enjoyed learning about this beloved Swiss pastry, I hope you’re feeling inspired to bring a little taste of Switzerland into your kitchen.
There’s something truly special about baking fresh Gipfeli at home—from the rich aroma filling your kitchen to that first bite of a warm, buttery pastry. Whether you enjoy them plain, with jam, or as a savory treat, each bite is a reminder of the simple joys of homemade baking.
So why not make it a tradition? Bake a batch for a cozy weekend breakfast, share them with family and friends, or experiment with new flavors. No matter how you enjoy them, homemade Gipfeli will always be a treat worth savoring.
Now it’s your turn—grab your rolling pin, preheat your oven, and let the magic of baking begin! 🥐💛✨