

The Ultimate Rock Cakes Recipe Guide: Old-Fashioned, Easy & Delicious
Table of Contents
Introduction to Rock Cakes

What Are Rock Cakes?
Rock cakes—despite the slightly misleading name—are anything but hard as rocks. These crumbly, golden, and lightly sweetened baked treats resemble little rocky mounds due to their rustic appearance. Made traditionally with flour, butter, sugar, eggs, and dried fruits, rock cakes offer a delightful combination of crunchy outside and soft, fluffy inside. Their name stems from their craggy texture, not their consistency.
These charming little cakes are a staple of British baking, best enjoyed with a hot cup of tea or as a midday snack. They don’t require any complicated methods or obscure ingredients, making them ideal for beginner bakers. Plus, they take under 30 minutes from mixing bowl to bite, which is perfect when you’re short on time but still crave something homemade.
Their modest nature makes them versatile—you can tweak them with spices, zests, chocolate chips, or alternative sweeteners. Think of rock cakes as the ultimate blank slate in baking—timeless, cozy, and comforting, with just enough wiggle room to let your creativity shine.
The History Behind Rock Cakes
Rock cakes have a humble but fascinating history that goes way back. They gained widespread popularity during World War II, when rationing meant ingredients like eggs, butter, and sugar had to be used sparingly. Their simplicity made them perfect for households trying to stretch their pantry while still putting together a delicious snack.
These no-fuss cakes are often associated with British teatime traditions and can be found in cookbooks dating back to the 19th century. However, their real spotlight moment came thanks to the beloved Harry Potter series—remember Hagrid’s rock-hard version? Thankfully, the real thing is far more tender and toothsome!
Despite their old-fashioned origins, rock cakes remain a favorite among all age groups today. Whether baked for nostalgia or simply for the joy of something quick and tasty, they carry a timeless charm that’s hard to resist.
Why You’ll Love This Rock Cakes Recipe
Quick and Simple Ingredients
One of the main reasons rock cakes have stood the test of time is how incredibly easy they are to make. There’s no need for special ingredients or exotic add-ins—most of what you need is already sitting in your pantry. Flour, baking powder, sugar, butter, eggs, and a bit of milk form the foundation. Add some dried fruit like raisins or sultanas, and you’re ready to go.
Because the recipe doesn’t require any creaming or kneading, it’s ideal for those last-minute baking urges. Plus, it’s forgiving—measurements don’t have to be pinpoint precise, and overmixing isn’t usually an issue. If you’re new to baking, rock cakes offer a stress-free entry point into the world of homemade goodness.
And if you’re on a budget, you’ll love how cost-effective they are. You can batch-make a dozen in no time, and they stay fresh for days. Want to whip up a treat without running to the store? This is your go-to recipe.
Perfect for Beginners and Busy Bakers
Don’t have fancy tools? No worries. Rock cakes don’t need stand mixers, food processors, or digital thermometers. A bowl, spoon, and baking tray are about all it takes. That simplicity makes them ideal for kids learning to bake or busy parents who want to involve their little helpers in the kitchen.
And for those juggling a packed schedule, the recipe’s efficiency is a godsend. From start to finish, you can expect the whole process to take less than half an hour. That means you can have a warm, homemade treat without disrupting your entire day. Who doesn’t love that kind of kitchen magic?
Essential Ingredients for Rock Cakes
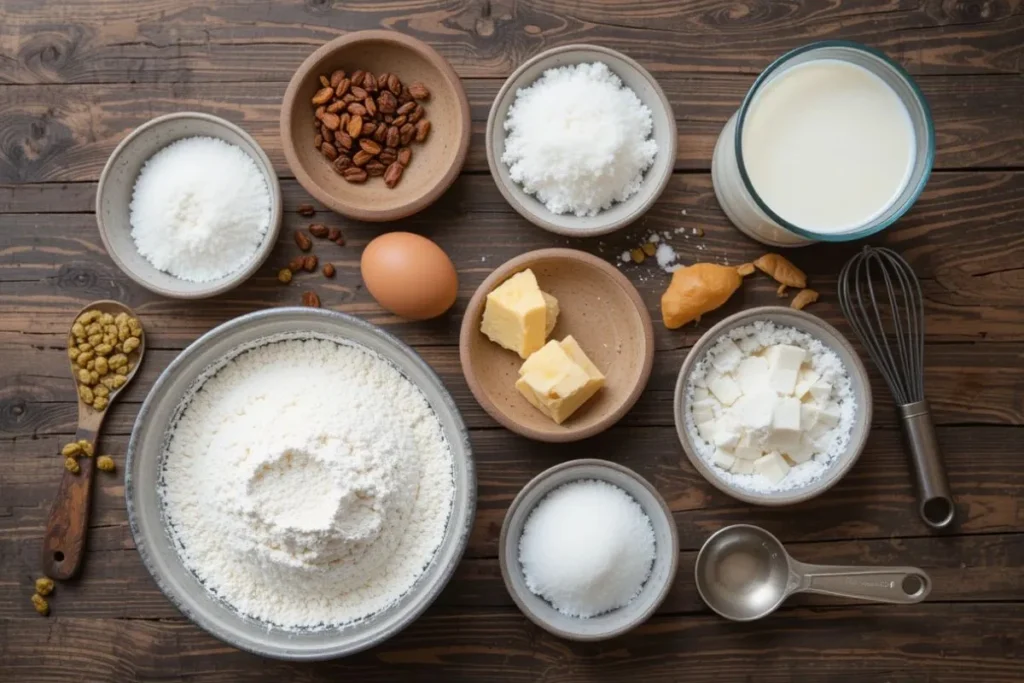
Dry Ingredients Breakdown
- Self-raising flour (2 cups or 250g): This flour has built-in leavening agents to help the cakes rise and form their iconic rugged tops.
- Caster sugar (1/2 cup or 100g): Provides the right sweetness without overwhelming the flavor.
- Baking powder (1 tsp): Even with self-raising flour, an extra boost helps create a fluffier texture.
- Salt (a pinch): Brings out the flavors and cuts through the sweetness for a more balanced taste.
- Mixed dried fruit (1 cup or 150g): Raisins, sultanas, or even chopped dried apricots work well.
The combination of these dry ingredients gives rock cakes their signature crumbly structure. You can play around with the fruit choices—cranberries, chopped dates, or even coconut flakes for a tropical twist.
Wet Ingredients Breakdown
- Butter (1/2 cup or 115g): Cold and cubed—this helps achieve the crumbly texture when rubbed into the flour.
- Egg (1 large): Acts as a binder while adding moisture and a touch of richness to the mix.
- Milk (2–3 tbsp): Just enough to bring the dough together without making it sticky.
The cold butter is essential here. Like in scones, rubbing in the butter creates little pockets of fat that melt during baking, creating a tender, airy structure inside with a slight crunch on the outside.
Optional Add-ins for Flavor Twists
- Spices: A sprinkle of cinnamon or nutmeg lends a cozy warmth and depth of flavor.
- Zests: Lemon or orange zest can brighten up the flavor.
- Vanilla extract (1 tsp): Adds depth and rounds off the sweetness.
- Chocolate chips: For those who want a dessert version.
These small tweaks can transform a traditional rock cake into something more modern and customized to your taste. Want something festive? Mix in a pinch of mixed spice and a handful of dried cranberries for extra flavor and texture. Feeling indulgent? Chocolate and orange zest never disappoint.
Tools You’ll Need
Basic Baking Tools Checklist
- Mixing bowls (preferably one large)
- Measuring cups and spoons
- Fork or pastry cutter (for rubbing in butter)
- Baking tray
- Parchment paper or non-stick baking mat
- Cooling rack
No fancy gear required. You can make rock cakes with just the essentials, which is part of their universal appeal. If you’ve got a mixing bowl and something to stir with, you’re basically halfway there.
Recommended Equipment for Best Results
- Digital scale: For more accurate ingredient measuring.
- Sifter: Helps aerate the flour and removes clumps.
- Cookie scoop or ice cream scoop: For evenly sized cakes.
- Oven thermometer: Optional, but great for making sure your oven’s temperature is accurate.
These tools can help ensure consistent results, but they’re far from mandatory. The beauty of this recipe is that it welcomes all levels of bakers, from hobbyists to pros.
Step-by-Step Instructions for Perfect Rock Cakes
Preparing the Dough
Start by setting your oven to 180°C (350°F) and lining a baking tray with parchment paper to prevent sticking.
In a large bowl, sift together the self-raising flour, baking powder, and salt. Add the cubed butter and gently rub it into the dry ingredients with your fingertips until the mixture looks like coarse breadcrumbs.
Next, mix in the caster sugar and dried fruit until evenly distributed throughout the mixture. In a separate bowl, lightly beat the egg and mix it with milk and vanilla extract (if using). Pour the wet mixture into the dry ingredients and stir just until a sticky, crumbly dough forms.
Avoid overmixing—it should be rough-looking, not smooth like cookie dough. You want those uneven bits for that classic “rocky” appearance.
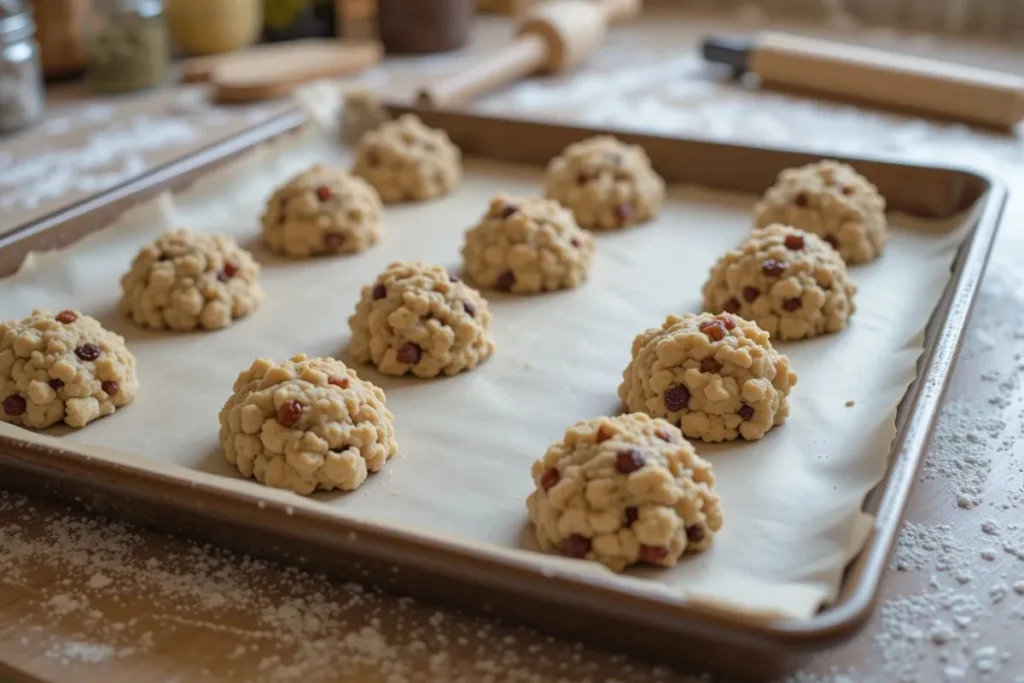
Shaping and Baking
Once your dough is ready, it’s time to shape your rock cakes. Using a spoon, or better yet, an ice cream scoop, drop heaping mounds of the dough onto your prepared baking tray. Be sure to space them about 2 inches apart on the tray, as they’ll spread a little while baking. Don’t worry about shaping them perfectly; their rough, uneven tops are what give rock cakes their name and charm.
You can optionally sprinkle a little demerara sugar on top of each mound for added crunch and sparkle. Then, place the tray in the preheated oven and bake for 15–20 minutes, or until the tops are golden brown and a skewer inserted into the center comes out clean.
Be mindful not to overbake. You want them lightly golden on the outside while still soft and slightly moist inside. Since ovens can vary, it’s a good idea to start checking around the 15-minute mark. If your rock cakes seem too pale, give them another 2–3 minutes, but don’t let them dry out.
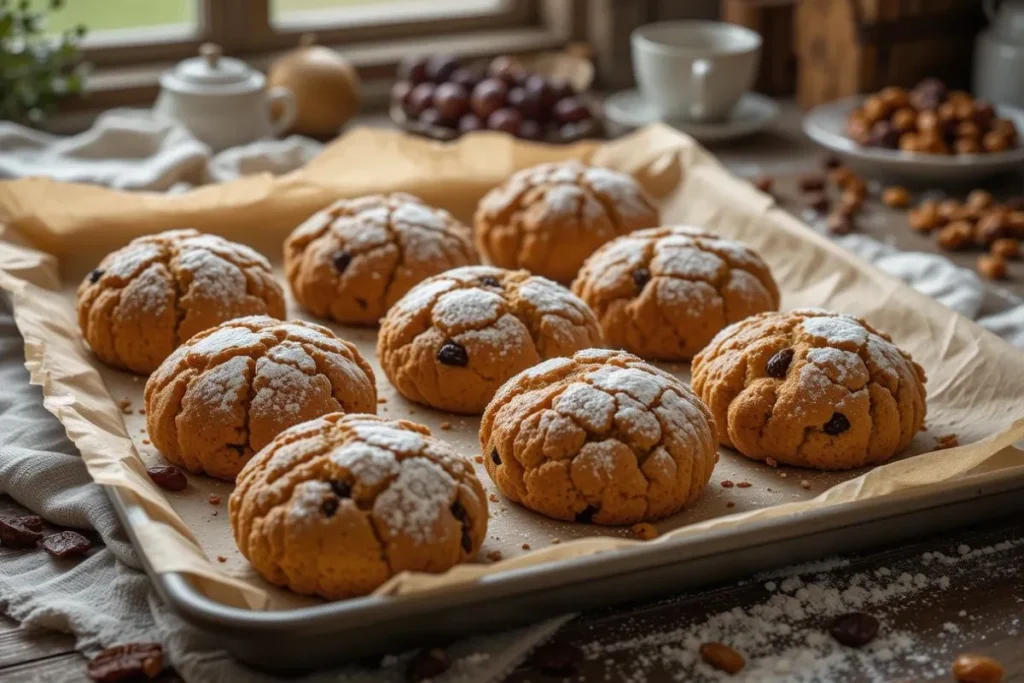
Cooling and Serving Tips
Once they’re out of the oven, allow the rock cakes to cool on the tray for about 5 minutes. Once baked, transfer them to a wire rack and let them cool completely. This helps maintain their texture—crisp edges with a soft center.
Serve them slightly warm or at room temperature. They’re perfect on their own, but even better with a slather of butter, a drizzle of honey, or alongside a steamy mug of tea or coffee. Want to get fancy? Pair them with a dollop of clotted cream or your favorite jam for a decadent treat.
These also make great lunchbox additions or afternoon pick-me-ups. Just wrap them up in parchment or store them in a tin, and you’re good to go.
Rock Cakes Recipe Variations

Fruity Rock Cakes
Fruity rock cakes are the most traditional version and often include sultanas, raisins, currants, or a mix of all three. But why stop there? Dried apricots, chopped dates, and cranberries also make fantastic additions. Want a tropical twist? For a tropical twist, try mixing in dried pineapple or mango pieces along with a sprinkle of coconut.
To take it up a notch, soak your dried fruits in warm tea, orange juice, or even a splash of rum for 10 minutes before adding them to the dough. This infuses extra moisture and flavor, making each bite even juicier.
For an aromatic boost, toss in a teaspoon of mixed spice or cinnamon. The combination of fruit and spice will give you those cozy, comforting vibes that are perfect for cooler months.
Chocolate Chip Rock Cakes
Not a fan of dried fruits? Swap them out for chocolate chips! Use dark, milk, or white chocolate—or a mix if you’re feeling bold. Chocolate rock cakes are a hit with kids and sweet-toothed adults alike.
You can also add orange zest or a touch of instant coffee powder to complement the chocolate flavor. Want them extra indulgent? Fold in some chopped nuts like hazelnuts or walnuts for a bit of crunch.
Remember, since chocolate melts, these rock cakes tend to be softer inside and can get a bit gooey if eaten warm. Honestly, that’s part of the magic!
Vegan and Gluten-Free Rock Cakes
Going plant-based or avoiding gluten doesn’t mean missing out on this delicious treat. For vegan rock cakes, substitute the butter with vegan margarine or coconut oil, and use a flaxseed egg (1 tbsp flaxseed meal + 3 tbsp water, mixed and left to sit for 5 mins) instead of a regular egg.
Use plant-based milk—like almond or oat—and opt for dairy-free chocolate or dried fruits. Make sure your sugar is vegan (some white sugars are processed with bone char), and you’re good to go.
To make gluten-free rock cakes, just substitute the self-raising flour with a gluten-free self-raising flour blend. Add a half teaspoon of xanthan gum if your flour doesn’t already include it. The texture may be slightly different, but the flavor is just as rich and satisfying.
Tips for the Best Rock Cakes
Common Mistakes to Avoid
Even though rock cakes are simple, there are still a few pitfalls to steer clear of:
- Overmixing the dough: This can lead to dense, tough cakes instead of light and crumbly ones. Mix just until the ingredients come together.
- Too much milk: The dough should be slightly dry and sticky, not wet and batter-like. Add milk a tablespoon at a time.
- Using soft or melted butter: Cold butter is crucial for that crumbly texture. Room-temp or melted butter will give you a cakier texture.
- Overbaking: Keep a close eye on the oven. Overbaked rock cakes become dry and lose their appeal.
- Skipping the parchment paper: This prevents sticking and helps with even baking.
Pro Tips from Experienced Bakers
- Chill your dough for 10–15 minutes before baking if your kitchen is warm. This swap helps the cakes maintain their shape and structure during baking.
- Use your fingers to create rough, rocky tops—this gives them that classic look.
- Add a hint of citrus zest for brightness and a slight tang that cuts through the sweetness.
- Brush the tops with milk or egg wash before baking for a shiny, golden finish.
- Experiment with textures by combining both soft and chewy dried fruits like sultanas and dried cherries.
The beauty of rock cakes lies in their rustic imperfection. Don’t stress too much about uniformity—they’re supposed to look a little wild. That’s part of their charm.
Storing and Reheating Rock Cakes
How to Store for Freshness
Proper storage is key if you want your rock cakes to stay as delicious as the moment they came out of the oven. These treats are best enjoyed fresh, but they’ll keep well for a few days if stored correctly.
- Room Temperature: Store your fully cooled rock cakes in an airtight container. They’ll stay fresh for 3 to 4 days. If stacking, layer them with parchment paper to keep them from sticking together.
- Refrigeration: Not recommended unless your kitchen is overly warm, as the fridge can dry them out.
- Freezing: Rock cakes freeze beautifully. Wrap each one individually in cling film or foil, then store them in a zip-lock freezer bag. They’ll keep for up to 2 months. To thaw, leave them at room temperature for an hour or reheat gently in the oven.
Reheating Without Drying Out
No one wants a dry rock cake, right? Here’s how to reheat them properly:
- Oven method: Preheat your oven to 150°C (300°F). Wrap the rock cake loosely in foil and warm for about 8–10 minutes. This keeps the exterior slightly crisp while gently heating the inside.
- Microwave method: Place one rock cake on a microwave-safe plate. Cover with a damp paper towel and microwave for 15–20 seconds. This keeps it moist but be careful not to overdo it or you’ll get rubbery results.
- Toaster oven: Another great option if you’re reheating just one or two. Toast lightly for a crisp outside.
Whether warm or room temp, rock cakes are super forgiving. And when done right, reheated rock cakes taste almost like they’re freshly baked.
Pairing Ideas: What to Serve with Rock Cakes
Hot Drinks That Complement Rock Cakes
What’s a rock cake without the perfect drink to go with it? Here are a few tried-and-true combos:
- Black Tea (like Earl Grey or English Breakfast): A classic British pairing that balances the sweetness of the cake.
- Coffee: Whether it’s a strong espresso or a creamy latte, coffee and rock cakes go hand-in-hand.
- Chai Latte: The spiced notes in chai bring out the flavor of cinnamon or nutmeg in the rock cakes.
- Hot Chocolate: For a kid-friendly or ultra-comforting option, nothing beats warm cocoa with a rock cake on the side.
- Milk (dairy or plant-based): Simple and always a good choice, especially for the younger crowd.
These drinks not only complement the taste but also elevate the cozy experience of eating a rock cake.
Rock Cakes as a Dessert Option
Think rock cakes are just for tea time? Think again. These rustic beauties can totally work as a low-fuss dessert.
- With Ice Cream: Gently warm a rock cake and pair it with a scoop of vanilla or cinnamon ice cream for a cozy, indulgent treat. Drizzle with honey or caramel sauce for extra flair.
- With custard or cream: A drizzle of warm custard turns rock cakes into a pudding-style dessert that’s rich and comforting.
- Topped with Yogurt and Fruit: For a lighter option, split a rock cake in half and top it with creamy Greek yogurt and a handful of fresh berries. It’s a great brunch or breakfast-for-dessert idea.
Their versatility means they can wear many hats—from humble tea snack to impressive plated dessert.
Nutritional Information
Caloric Breakdown
Here’s an approximate nutritional profile for one average-sized traditional rock cake (based on a batch of 12 cakes):
| Nutrient | Amount per Rock Cake |
|---|---|
| Calories | 180–220 kcal |
| Carbohydrates | 28–30g |
| Sugars | 10–12g |
| Protein | 3–4g |
| Fat | 7–9g |
| Saturated Fat | 4–5g |
| Fiber | 1–2g |
This can vary based on your exact ingredients—chocolate chip versions will have more sugar and fat, while vegan or gluten-free ones may be slightly different in macronutrient values.
Healthier Substitutions
If you’re looking to make your rock cakes a bit healthier, here are a few easy swaps:
- Use whole wheat flour or oat flour for more fiber and nutrients.
- Swap out butter for coconut oil or light olive oil.
- Reduce sugar and add sweetness with mashed bananas or applesauce.
- Use low-fat milk or plant-based alternatives like almond or soy milk.
- Add seeds or nuts like flaxseed, chia, or chopped almonds for added protein and crunch.
These small changes can make your rock cakes more wholesome while still keeping that classic flavor intact.
Rock Cakes for Different Occasions
Afternoon Tea Delights
Rock cakes are practically made for a proper afternoon tea. Their humble appearance and crumbly texture fit perfectly alongside cucumber sandwiches, scones, and mini cakes. You can make mini rock cakes for bite-sized portions or stick with the classic size for a more rustic vibe.
Serve them on a tiered cake stand with your best china, and they’ll shine just as much as fancier pastries. A dusting of icing sugar right before serving adds an elegant touch.
Party Treats and School Snacks
Looking for a snack that travels well and pleases both kids and adults? Rock cakes are your friend.
- School lunchbox-friendly: They don’t crumble too much, aren’t overly sweet, and are nut-free (unless you add them).
- Picnic-perfect: No frosting means no mess. Just grab and go.
- Party trays: Make mini versions and pair them with cupcakes and cookies for a colorful snack table.
And if you’re baking with kids, rock cakes are the perfect introductory recipe—easy, quick, and super fun to shape with their little hands.
Common FAQs About Rock Cakes
Can I Freeze Rock Cakes?
Yes, absolutely! Rock cakes freeze wonderfully, making them perfect for batch baking. Here’s how to do it right:
- Freeze after baking: Let your rock cakes cool completely, then wrap each one individually in cling film or foil. Place them in a zip-lock bag or airtight container and store in the freezer for up to 2 months.
- Thawing: Remove as many as you need and let them thaw at room temperature for 1–2 hours. If you want them warm, pop them in the oven at 150°C (300°F) for 8–10 minutes.
- Avoid microwaving directly from frozen as it can lead to soggy or unevenly heated cakes.
Freezing rock cakes is a smart way to always have a homemade treat on hand, especially for unexpected guests or snack cravings.
Why Are My Rock Cakes Dry?
Dry rock cakes are usually the result of one or more of these common mistakes:
- Too much flour: Measuring by eye can lead to overpacking flour. Always spoon the flour into your measuring cup and level it off with a flat edge to ensure accuracy and avoid using too much.
- Overbaking: Just a few extra minutes in the oven can lead to dry rock cakes, so keep a close eye on the baking time. Watch the baking time closely.
- Too little fat or liquid: Be sure your butter and milk ratios are on point. Don’t skimp!
- Old baking powder: If it’s not active, your cakes won’t rise properly and may come out dense and dry.
- High oven temperature: Some ovens run hotter than they say. Use an oven thermometer to be sure.
To prevent dryness, follow the recommended ingredient ratios, monitor your baking time closely, and consider checking your oven’s temperature for accuracy.
Conclusion
Rock cakes may have an old-school name and look a little rugged, but don’t let that fool you—they’re a delicious, easy-to-make treat that stands the test of time. Whether you’re baking them for a cozy afternoon tea, a lunchbox surprise, or just because you feel like having something homemade and satisfying, rock cakes deliver every single time.
What makes them truly special is their versatility. Stick to the classic fruity version, jazz them up with chocolate chips, or make a vegan or gluten-free batch—whatever suits your taste and lifestyle. With minimal prep, basic ingredients, and foolproof methods, rock cakes are perfect for bakers of all levels.
So next time you’re in the mood to bake but short on time or energy, skip the complicated recipes and whip up a batch of these golden beauties. Rustic, warm, and filled with charm—rock cakes are the unsung heroes of the baking world.
FAQs
1. How long do rock cakes last?
Rock cakes stay fresh for about 3 to 4 days in an airtight container at room temperature. You can also freeze them for longer storage.
2. Can I make rock cakes without eggs?
Yes! Use a flax egg or commercial egg replacer. You can also try mashed banana or applesauce as a binder.
3. Are rock cakes supposed to be hard?
Nope! Despite the name, rock cakes should be crumbly and slightly firm outside but soft and tender inside.
4. Can I make mini rock cakes?
Absolutely. Just use a smaller scoop and reduce the baking time by 3–5 minutes. Great for parties or kids’ snacks.
5. What’s the best fruit for rock cakes?
Traditional options like sultanas and raisins work great, but you can use cranberries, chopped apricots, or even a fruit mix. Soaking them first adds extra flavor and moisture.